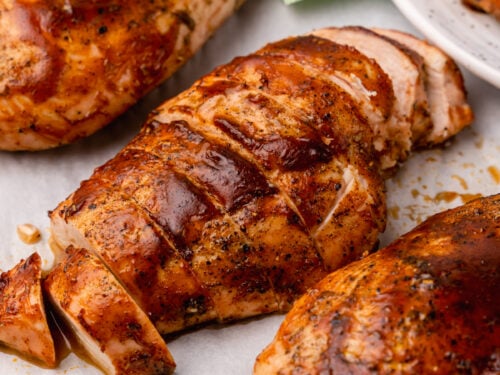
Baked BBQ Chicken Breast
Looking for a mouth-watering twist on a classic favorite? Our Baked BBQ Chicken Breast is not just your average barbecue chicken. This recipe brings together the irresistible juiciness of oven-baked chicken with a uniquely crafted BBQ sauce that tantalizes your taste buds. Perfect for a quick dinner or a nutritious meal, this chicken is marinated, seasoned, and baked to perfection, offering you a hassle-free way to enjoy gourmet flavors right at home.
Dive into our comprehensive guide, starting with essential tips on ingredient selection and preparation, we guide you through each step, explaining the science behind the cooking methods to help you achieve juicy, flavorful results.
Ingredients and Variations
To whip up this delectable Baked BBQ Chicken Breast, you’ll need the following key ingredients. We’ve also included a few variations to cater to different dietary preferences and spice levels:
- Chicken Breasts: Skinless and boneless, these are the star of the dish.
- BBQ Sauce: Use your favorite brand or a homemade version for that personal touch.
- Olive Oil: For marinating and ensuring the chicken doesn’t stick to your baking tray.
- Garlic Powder, Onion Powder, Smoked Paprika: These spices give the chicken a robust flavor.
- Salt and Pepper: For basic seasoning.
Variations:
- For a Spicier Kick: Add a teaspoon of cayenne pepper or a few dashes of hot sauce to the marinade.
- Gluten-Free Needs: Ensure your BBQ sauce is gluten-free or opt for a homemade sauce using gluten-free ingredients.
- Lower Sugar: Choose a low-sugar or sugar-free BBQ sauce, or make your own with honey as a natural sweetener.
- Vegetarian/Vegan Options: While this recipe is focused on chicken, a similar marinade and baking technique can be applied to thick slices of tofu or tempeh for a plant-based variant.
Essential Ingredients
To ensure your Baked BBQ Chicken Breast turns out juicy and flavorful, you’ll need the following ingredients:
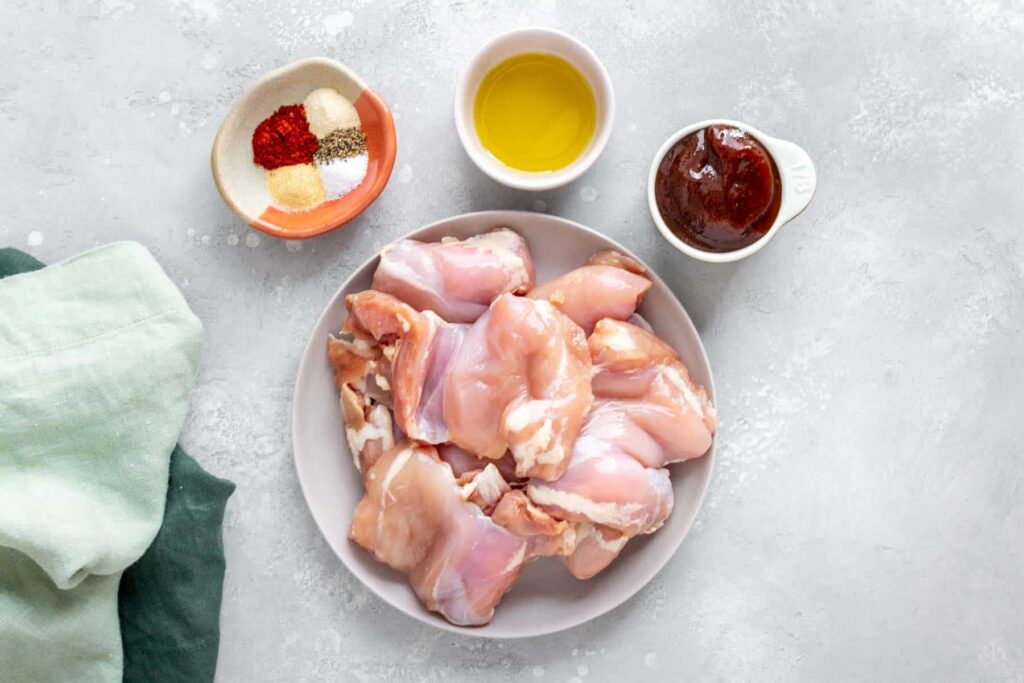
- Chicken Breasts: 4 large skinless, boneless chicken breasts (about 6-8 ounces each).
- BBQ Sauce: 1 cup of your favorite BBQ sauce, whether store-bought or homemade. If you’re making it at home, consider a blend of tomato sauce, vinegar, honey, and spices.
- Olive Oil: 2 tablespoons to help the sauce adhere to the chicken and prevent sticking during baking.
- Garlic Powder: 1 teaspoon for a mild, sweet garlic flavor.
- Onion Powder: 1 teaspoon to add depth and sweetness.
- Smoked Paprika: 1 teaspoon for a touch of smoky flavor that complements the BBQ sauce.
- Salt and Black Pepper: 1 teaspoon of each, or to taste, for basic seasoning.
With these ingredients, you’re all set to prepare a dish that’s bursting with flavor and perfectly baked. Each component plays a crucial role in building the profile of this beloved recipe.
Optional Variations and Swaps
Whether you’re accommodating dietary restrictions or simply experimenting with new flavors, here are some alternative ingredients you can use in your Baked BBQ Chicken Breast:
- Gluten-Free BBQ Sauce: If you’re avoiding gluten, make sure the BBQ sauce is labeled gluten-free. Many sauces contain gluten as a thickener, but there are plenty of delicious gluten-free options available.
- Low-Sodium BBQ Sauce: For those monitoring their sodium intake, opt for a low-sodium BBQ sauce or consider making your own at home where you can control the amount of salt added.
- Sugar-Free BBQ Sauce: To reduce sugar intake, look for or prepare a sugar-free BBQ sauce using sweeteners like stevia or erythritol.
- Spicy Variations: Add a kick to your chicken by including chopped jalapeños in the marinade or using a spicy BBQ sauce.
- Herb Enhancements: Mix in some dried or fresh herbs such as rosemary, thyme, or cilantro to the BBQ sauce for an aromatic touch.
- Citrus Twist: For a zesty flavor, add a squeeze of lemon or lime juice to the marinade. This not only boosts the taste but also helps in tenderizing the chicken.
- Vegan and Vegetarian Options: While our focus is on chicken, you can apply the same marinade and baking technique to plant-based alternatives like tofu or seitan for a vegetarian or vegan dish.
These swaps and variations allow you to customize the recipe to better fit your dietary needs and flavor preferences, making it a versatile option for any table.
Step-by-Step Cooking Instructions
Follow these simple steps to ensure your Baked BBQ Chicken Breast turns out perfectly juicy and flavorful every time:
Preparation:
- Preheat Oven: Start by heating your oven to 375 degrees Fahrenheit. This ensures your oven is hot enough to cook the chicken evenly and quickly.
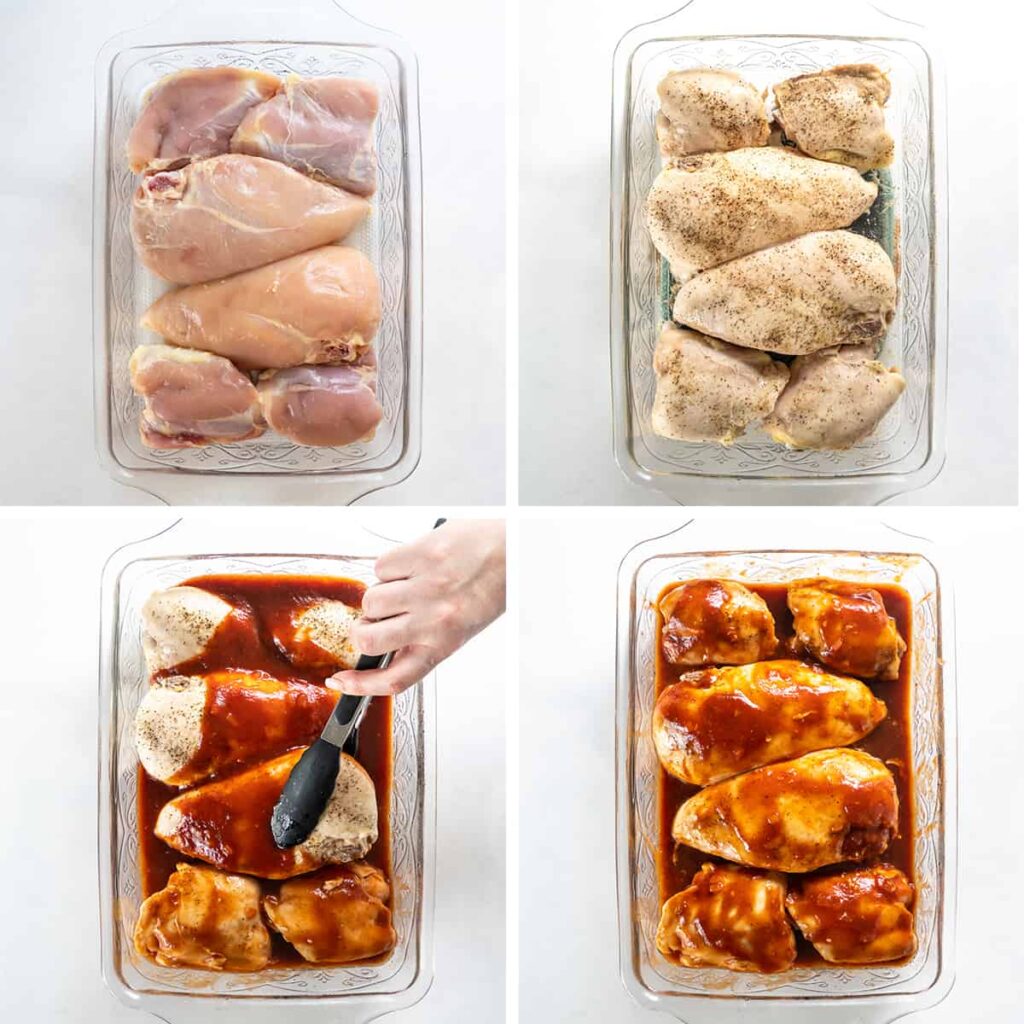
- Prepare the Chicken: While the oven preheats, lay the chicken breasts on a cutting board and pat them dry with paper towels. This helps the seasoning stick better and promotes even cooking.
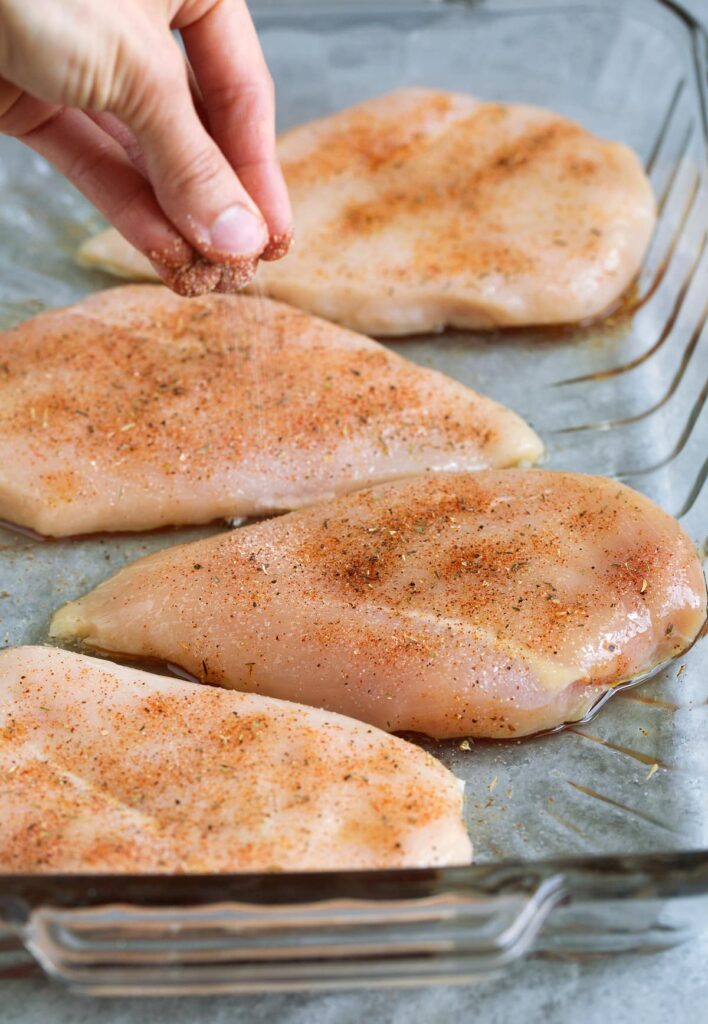
- Season the Chicken: In a small bowl, mix together the garlic powder, onion powder, smoked paprika, salt, and black pepper. Rub this seasoning mix all over the chicken breasts to coat them thoroughly.
- Oil and Sauce: Drizzle the olive oil over the seasoned chicken breasts, then brush them generously with BBQ sauce on all sides.
Baking:
- Arrange for Baking: Place the chicken breasts in a baking dish or on a lined baking sheet. Make sure they are not touching to ensure they cook evenly.
- Bake the Chicken: Put the chicken in the preheated oven and bake for 25-30 minutes, or until the internal temperature of the chicken reaches 165 degrees Fahrenheit on a meat thermometer.
- Add More Sauce (Optional): For extra juiciness and flavor, baste the chicken with additional BBQ sauce halfway through cooking.
Finishing Touches:
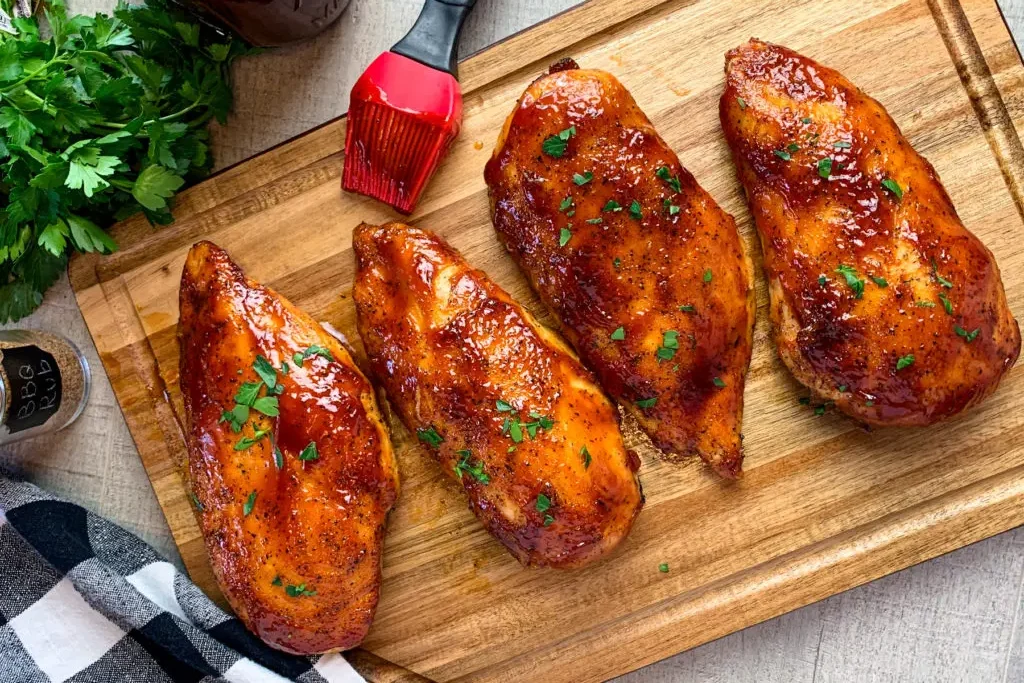
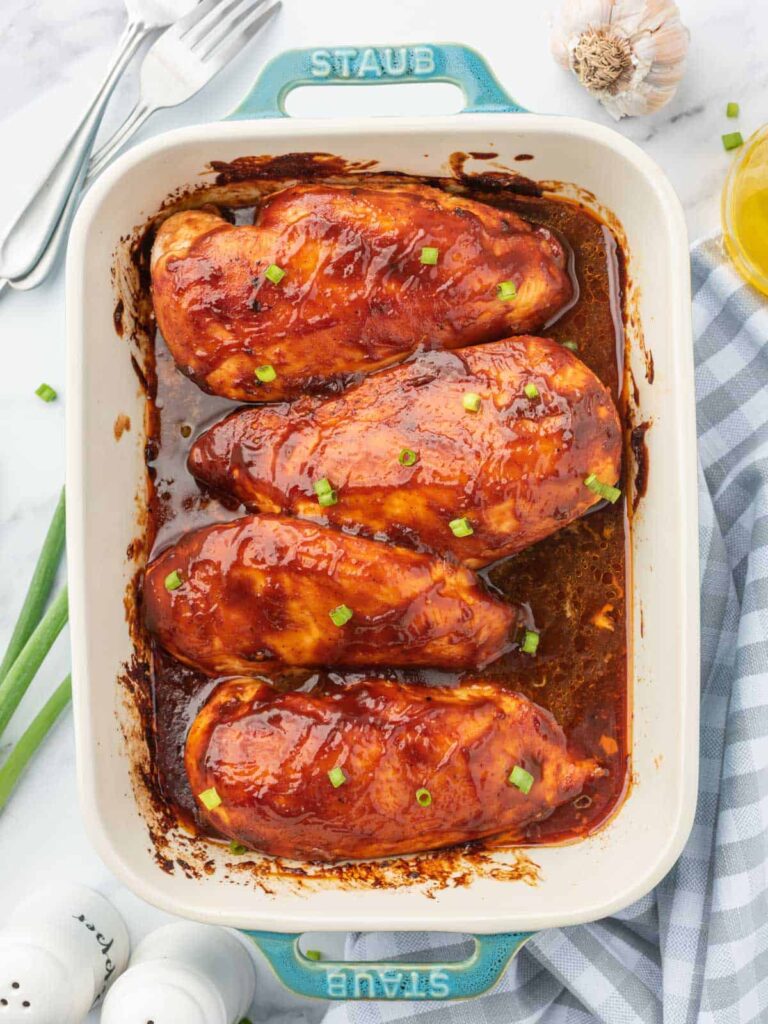
- Rest the Chicken: Once the chicken is cooked, remove it from the oven and let it rest for a few minutes. This helps the juices redistribute throughout the meat, making it moist and tender.
- Serve: Slice the chicken and serve it hot. You can add a final brush of BBQ sauce for a glossy, appetizing finish.
Preparation of Chicken
Getting your chicken ready for baking is a crucial step to ensure it cooks evenly and absorbs all the flavors you’re about to add. Here’s how to prep your chicken breasts perfectly:
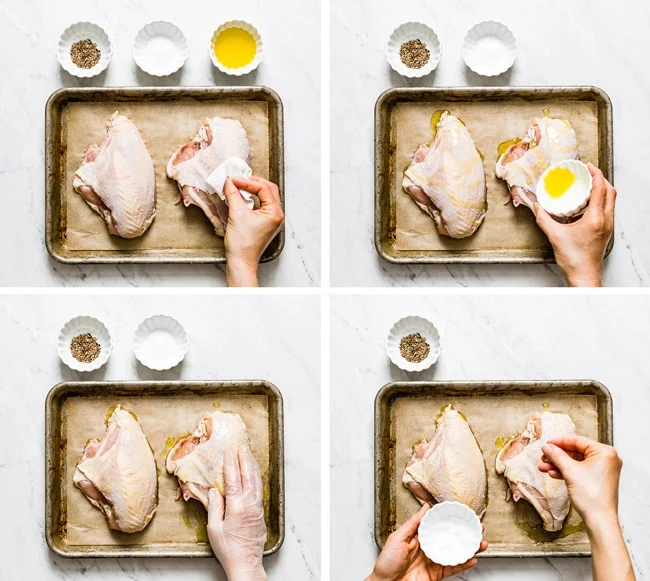
- Clean the Chicken: Start by rinsing the chicken breasts under cold water. This helps remove any residual blood or bone fragments from the packaging.
- Pat Dry: After rinsing, pat the chicken breasts thoroughly dry with paper towels. Removing excess moisture is key for the seasoning to stick properly and for achieving a nice sear in the oven.
- Trim Excess Fat: Take a moment to trim any excess fat off the chicken breasts. This isn’t just about removing fat; it’s also about shaping the chicken so it cooks uniformly.
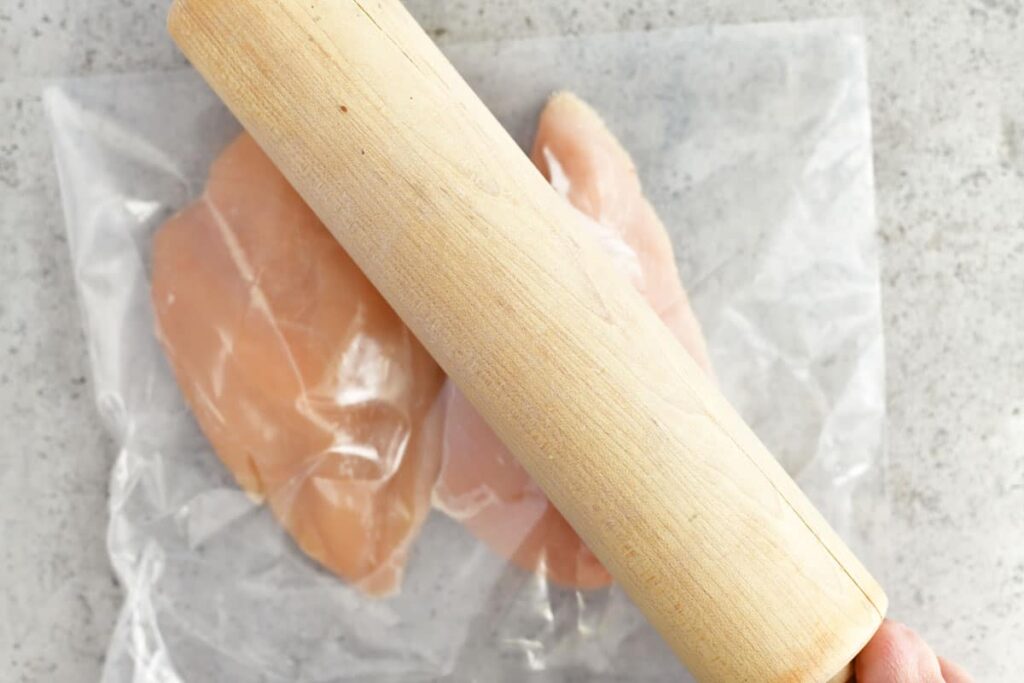
- Pound to Even Thickness (Optional): For even cooking, you can gently pound the thicker end of the chicken breast with a meat mallet until it’s about the same thickness as the thinner end. This step is optional but highly recommended for perfectly cooked, juicy chicken.
- Season: Once your chicken is prepped, you’re ready to move on to seasoning or marinating as per your recipe instructions.
Flattening and Seasoning the Meat
Flattening the chicken breasts to an even thickness is a key step for ensuring they cook uniformly and stay juicy. Here’s how to do it, along with tips on applying the seasonings for maximum flavor:
Flattening the Chicken:
- Place the Chicken: Lay a chicken breast between two pieces of plastic wrap or inside a resealable plastic bag. This helps to contain any splatter and keeps your work area clean.
- Pound Gently: Use a meat mallet or rolling pin to gently pound the thicker end of the chicken breast, working towards the edges. The goal is to achieve an even thickness of about 1/2 inch. Be careful not to hit too hard, as you want to flatten the chicken without tearing it.
Seasoning the Chicken:
- Mix Seasonings: In a small bowl, combine your chosen spices — such as garlic powder, onion powder, smoked paprika, salt, and black pepper. This mixture will create a flavorful base for the BBQ sauce.
- Apply Olive Oil: Lightly brush the chicken breasts with olive oil. The oil acts as a binder for the spices and helps them adhere to the meat, while also aiding in moisture retention during baking.
- Rub in Spices: Sprinkle the seasoning mix generously over both sides of the chicken breasts. Rub the spices into the meat to ensure they are well distributed and stick to the oil-coated surface.
- Add BBQ Sauce: Once the chicken is evenly seasoned, apply your BBQ sauce liberally. The sauce not only adds flavor but also creates a delicious glaze as it cooks.
Applying BBQ Sauce
The right application of BBQ sauce can make a big difference in the taste and texture of your Baked BBQ Chicken Breast. Here’s how to do it like a pro:
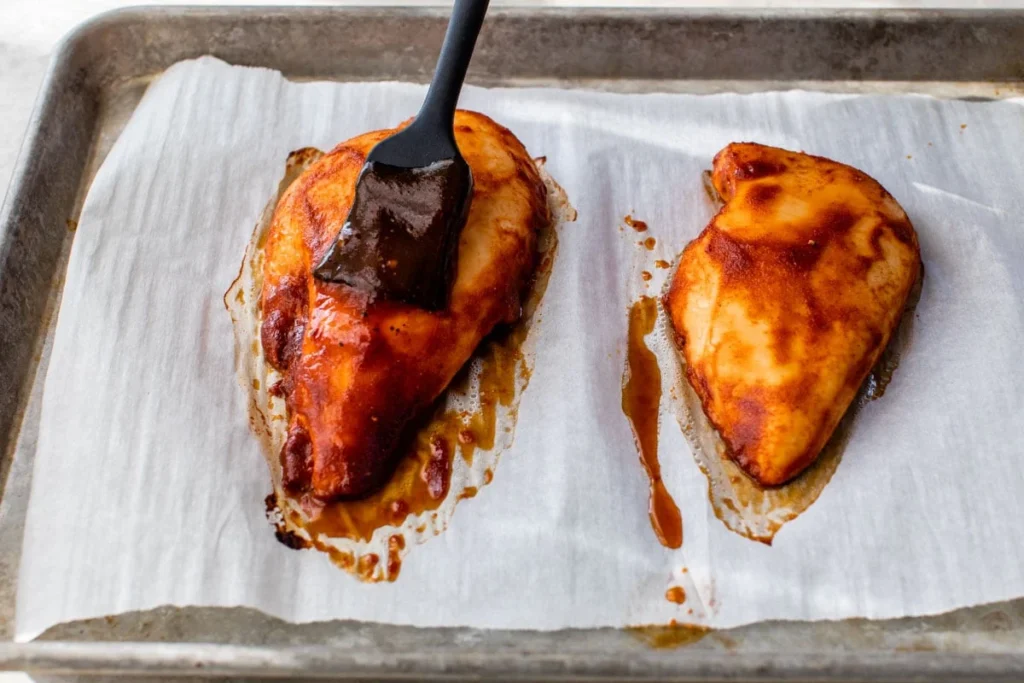
- Choose the Right Sauce: Select a BBQ sauce that complements the spices you’ve used. Whether you prefer a smoky, sweet, or spicy sauce, make sure it matches the flavor profile you want.
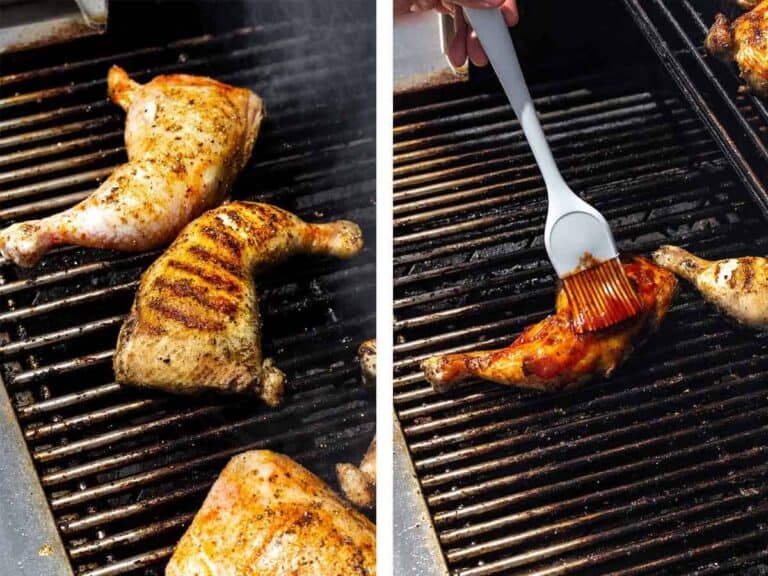
- Timing is Key: To prevent the sauce from burning or becoming too dry, don’t apply it too early. Wait until the last 10-15 minutes of baking to brush the sauce onto the chicken. This allows the sauce to caramelize nicely without overcooking.
- First Coating: When there are about 10-15 minutes left in your cooking time, remove the chicken from the oven. Brush a generous layer of BBQ sauce over the top of each chicken breast, ensuring it cover all sides. The heat from the chicken will help the sauce stick and start to soak in.
- Bake Again: Return the chicken to the oven to allow the sauce to bake into the meat and form a deliciously sticky coating. This step enhances the flavors and helps achieve that classic BBQ finish.
- Add a Final Glaze: Just before serving, consider adding a final coat of BBQ sauce for extra moisture and flavor. This last-minute application gives your dish a fresh, glossy look and ensures every bite is packed with BBQ goodness.
Adding Sauce in Stages
Layering BBQ sauce in stages during the cooking process can significantly enhance the flavor and texture of your Baked BBQ Chicken Breast. Here’s why and how you should consider this technique:
Benefits of Multiple Sauce Applications:
- Builds Depth of Flavor: Applying BBQ sauce at different stages allows each layer to cook onto the surface of the chicken, building a more complex and richer flavor profile. Each application cooks into the meat, adding its distinct layer of taste.
- Prevents Burning: BBQ sauce contains sugars that can burn easily if exposed to high temperatures for too long. By adding sauce in stages, especially towards the end of cooking, you minimize the risk of burning, ensuring a perfectly caramelized finish rather than a charred exterior.
- Enhances Moisture Retention: Each coating of sauce helps seal in the chicken’s natural juices, keeping it moist and tender. The sauce acts as a barrier, reducing moisture loss as the chicken cooks.
How to Apply Sauce in Stages:
- Initial Seasoning: After seasoning with dry spices, bake the chicken initially without any BBQ sauce. This allows the spices to penetrate the meat and start building the flavor base.
- Mid-Cooking Application: About halfway through the cooking time, brush a layer of BBQ sauce onto the chicken. This layer will bake into the meat, forming a flavorful crust.
- Final Glaze: In the last 10-15 minutes of baking, apply another layer of BBQ sauce. This final glaze will caramelize on the surface, adding a rich, glossy finish.
- Post-Cooking Brushing: Once you remove the chicken from the oven, consider giving it one last brush of fresh BBQ sauce for added moisture and flavor. This step is particularly useful if the chicken will sit before serving, as it adds a fresh layer of taste and keeps the chicken juicy.
Baking Instructions
Baking your chicken correctly is crucial for achieving that perfectly cooked BBQ chicken breast. Follow these steps to ensure it’s done just right:
Preheat the Oven: Before you begin, preheat your oven to 375 degrees Fahrenheit (190 degrees Celsius). This ensures that the oven reaches the right temperature for an even cooking process.
Arrange the Chicken: After seasoning and initial saucing, place the chicken breasts on a baking tray lined with parchment paper or a lightly greased baking dish. Ensure that the chicken breasts are spaced out evenly. They should not touch each other, which helps them cook evenly on all sides and allows heat to circulate around each piece.
Initial Cooking Phase: Place the tray in the oven and bake the chicken for about 20 minutes. This initial cooking helps the chicken start to cook through without the outside becoming too dry.
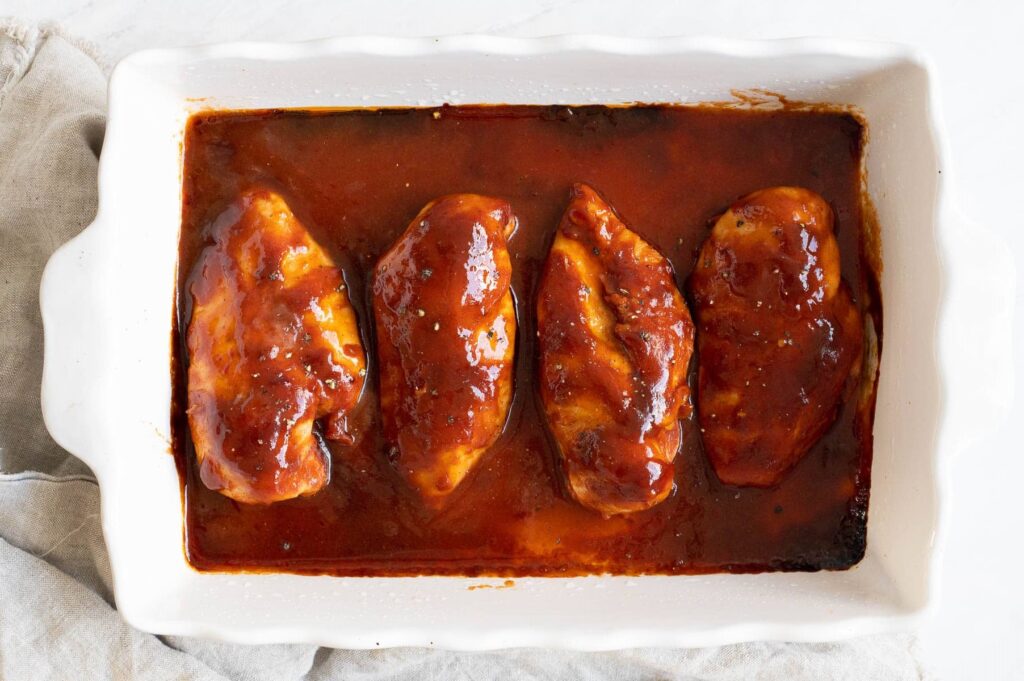
Applying BBQ Sauce: After the initial 20 minutes, remove the tray from the oven and brush a generous amount of BBQ sauce over the chicken breasts. The sauce should cover every part of the chicken surface for optimal flavor and moisture.
Continue Baking: Return the chicken to the oven and continue to bake for an additional 10-15 minutes. The total cooking time should be around 30-35 minutes, but the exact time can depend on the thickness of the chicken breasts. Use a meat thermometer to check that the internal temperature of the chicken reaches 165 degrees Fahrenheit (74 degrees Celsius). This temperature ensures that the chicken is safely cooked through and juicy.
Final Sauce Application and Broiling (Optional): For a more caramelized top, you can brush one more layer of BBQ sauce on the chicken and then broil it for 2-3 minutes at the end of the baking period. Keep a close watch during broiling as the sauce can burn quickly.
Rest Before Serving: Once cooked, remove the chicken from the oven and let it rest for a few minutes. This allows the juices to redistribute throughout the meat, ensuring that your chicken is juicy and tender when sliced.
Cooking Tips and Techniques
Mastering the art of baking BBQ chicken breasts requires a few professional tips and techniques. Here’s what you need to know to elevate your cooking and ensure perfect results every time:
Maintaining Moisture
- Marinate First: For extra juicy chicken, marinate the breasts for at least an hour before baking. This not only enhances the flavor but also helps maintain moisture during cooking.
- Do Not Overcook: Overcooking is a common reason for dry chicken. Keep a close eye on the cooking time and use a meat thermometer to ensure the internal temperature reaches 165 degrees Fahrenheit—no more, no less.
- Cover with Foil: If you find your chicken is browning too quickly or drying out, loosely cover it with aluminum foil during the first part of baking. This helps keep in moisture without steaming the chicken too much.
Checking Doneness
- Use a Meat Thermometer: A digital meat thermometer is your best friend for ensuring the chicken is cooked through without guessing. Insert it into the thickest part of the breast; once it reads 165 degrees Fahrenheit, the chicken is safe to eat.
- Visual Cues: Besides the thermometer, look for clear juices running from the chicken when pierced with a knife. If the juices are pink or red, it needs more cooking time.
Enhancing Flavor
- Rest Before Cutting: Let the chicken rest for 5-7 minutes after baking. This allows the juices to redistribute, making the meat more tender and flavorful when you cut into it.
- Add Freshness: After baking, a sprinkle of fresh herbs (like chopped parsley or cilantro) can add a bright, fresh contrast to the rich BBQ flavors.
Technique Tweaks
- Broil for Finish: For a beautifully caramelized top, switch the oven to broil during the last 2-3 minutes of cooking. Watch it closely to avoid burning the sauce.
- Layer the Flavors: As mentioned earlier, adding BBQ sauce in stages can create a more complex flavor profile. Each layer should have time to bake onto the chicken before adding the next.
How Long to Bake
Knowing exactly how long to cook BBQ chicken breast in oven is crucial for achieving that perfectly juicy and flavorful result. Here are the guidelines:
Preheat the Oven: Before you start, ensure your oven is preheated to 375 degrees Fahrenheit (190 degrees Celsius). This consistent temperature is key for even cooking.
Initial Baking: Place the seasoned and oiled chicken breasts on a baking tray. Bake in the preheated oven for approximately 20 minutes. This initial cooking phase is important to partially cook the chicken through without any BBQ sauce.
Adding BBQ Sauce: After 20 minutes, remove the chicken from the oven and brush a generous amount of BBQ sauce over each breast. Make sure the sauce covers all sides of the chicken to maximize flavor.
Final Baking: Return the chicken to the oven and continue to bake for an additional 10-15 minutes. The total cooking time will typically be between 30 to 35 minutes. However, the exact time can vary depending on the size and thickness of your chicken breasts.
Check for Doneness: The safest way to ensure your chicken is perfectly cooked is to use a meat thermometer. The internal temperature should reach 165 degrees Fahrenheit (74 degrees Celsius) when inserted into the thickest part of the breast.
Tips to Prevent Drying Out
Ensuring your BBQ chicken breast remains moist and succulent from oven to table is key to a delicious meal. Here are some tried and true tips to prevent your chicken from drying out:
- Avoid Overcooking: The most common cause of dry chicken is overcooking. Use a meat thermometer to check the chicken’s internal temperature. Remove the chicken from the oven as soon as it reaches 165 degrees Fahrenheit (74 degrees Celsius).
- Marinate Before Cooking: Marinating the chicken not only adds flavor but also helps to keep it moist during cooking. A simple marinade of olive oil, lemon juice, and your chosen spices can work wonders. Allow the chicken to marinate for at least one hour, or overnight for more profound flavor.
- Bake at the Right Temperature: Baking at a moderate temperature, like 375 degrees Fahrenheit (190 degrees Celsius), helps cook the chicken evenly without zapping its moisture. High temperatures can cause the chicken to dry out quickly.
- Use a Roasting Rack: Placing chicken breasts on a roasting rack in the baking tray can help heat circulate evenly around the chicken, cooking it more evenly and preventing the bottom from getting soggy.
- Cover with Foil: If you notice the chicken is browning too quickly on the outside but not cooked through on the inside, loosely cover it with aluminum foil. This will help to retain moisture and reduce the rate at which the surface dries out.
- Basting: Baste the chicken with its juices or extra BBQ sauce halfway through the cooking process. Basting helps to add moisture to the surface of the chicken and infuses it with flavors.
- Let It Rest: After baking, let the chicken rest covered for about 5-7 minutes before cutting into it. Resting allows the juices to redistribute throughout the meat, which helps keep it moist.
Serving Suggestions for Baked BBQ Chicken Breast
Presenting your Baked BBQ Chicken Breast in an appealing manner can enhance the dining experience. Here are some tips to beautifully serve this dish:

- Add Garnishes: Lemon wedges or orange slices can be placed around the platter for a bright, citrusy touch that complements the smoky flavors of the BBQ.
- Side Dishes: Serve the chicken with side dishes that offer contrasting colors and textures. For instance, a vibrant green bean almondine or a colorful mixed salad can make the plate more visually appealing.
- Drizzle Extra BBQ Sauce: Right before serving, drizzle a little extra BBQ sauce over the chicken for a glossy, appetizing look.
- Serve on a Wooden Platter: Presenting BBQ dishes on a wooden platter can enhance the rustic appeal of the meal, making it even more inviting.
- Add a Wedge of Lemon: A small wedge of lemon on the side not only adds to the visual appeal but allows guests to add a zesty freshness to their chicken if desired.
What to Serve with BBQ Chicken

- Classic Coleslaw: A creamy or vinegar-based coleslaw adds a refreshing crunch that balances the savory BBQ flavors wonderfully.
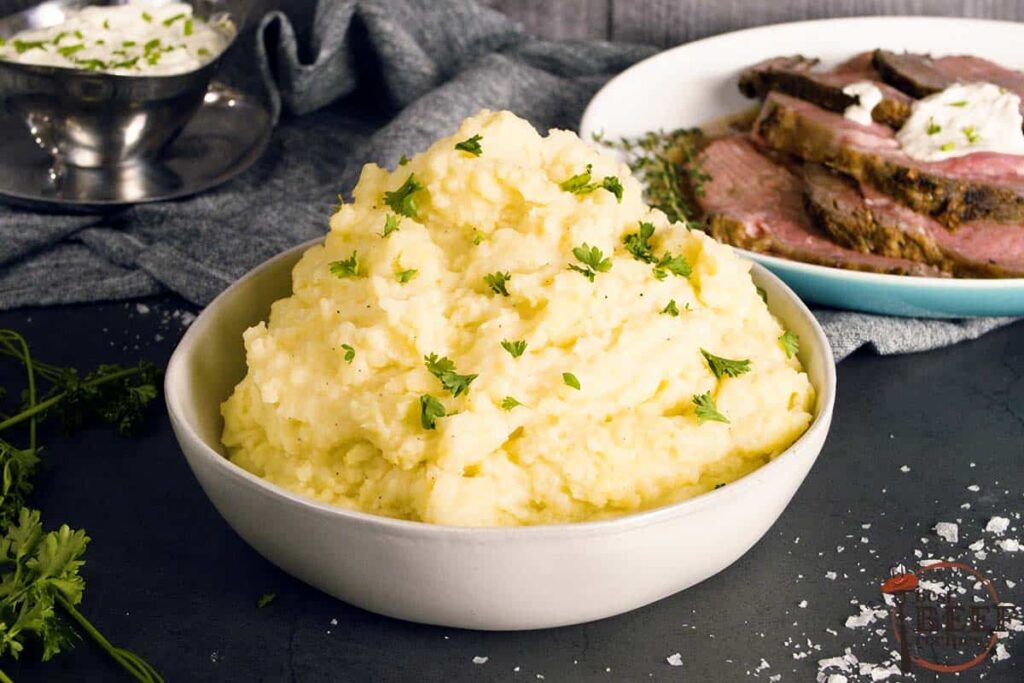
- Garlic Mashed Potatoes: Soft, creamy mashed potatoes with a hint of garlic make a comforting side that soaks up the BBQ sauce deliciously.
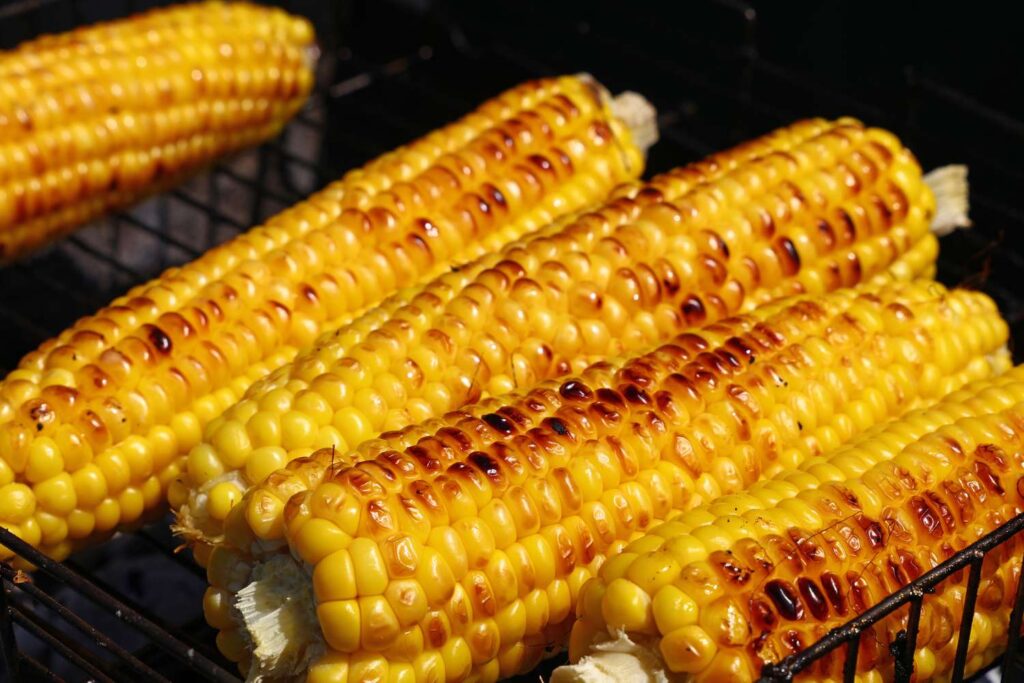
- Grilled Corn on the Cob: Offer a hint of smokiness that mirrors the BBQ theme; brush with butter and sprinkle some herbs or parmesan for extra flavor.
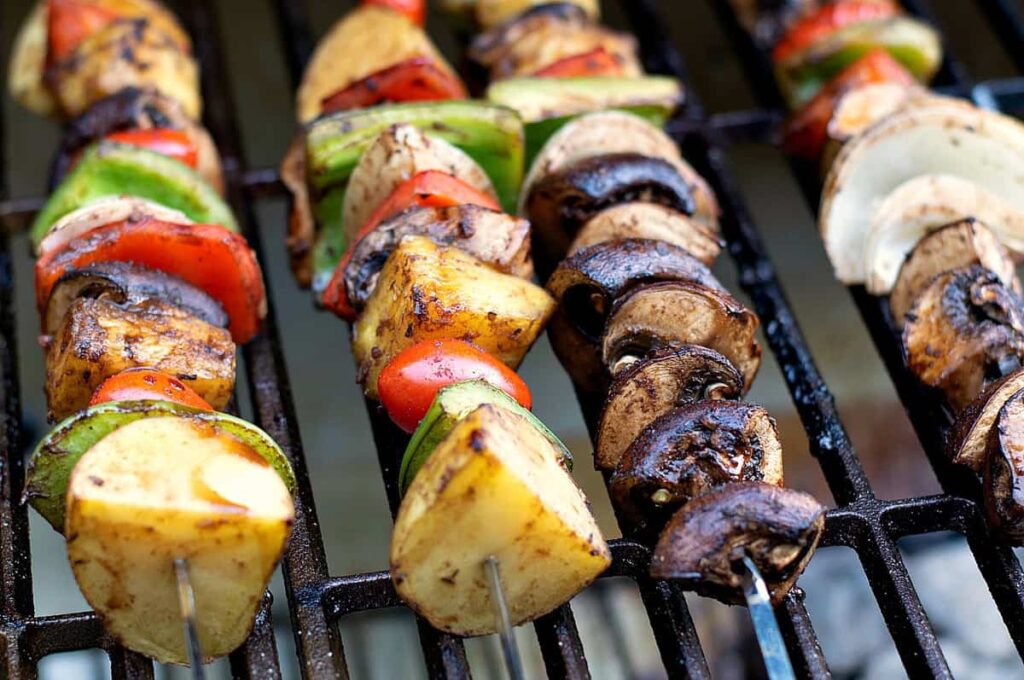
- Roasted Vegetables: A mix of seasonal vegetables like bell peppers, zucchini, and red onions roasted until caramelized can add color and nutrition to your plate.
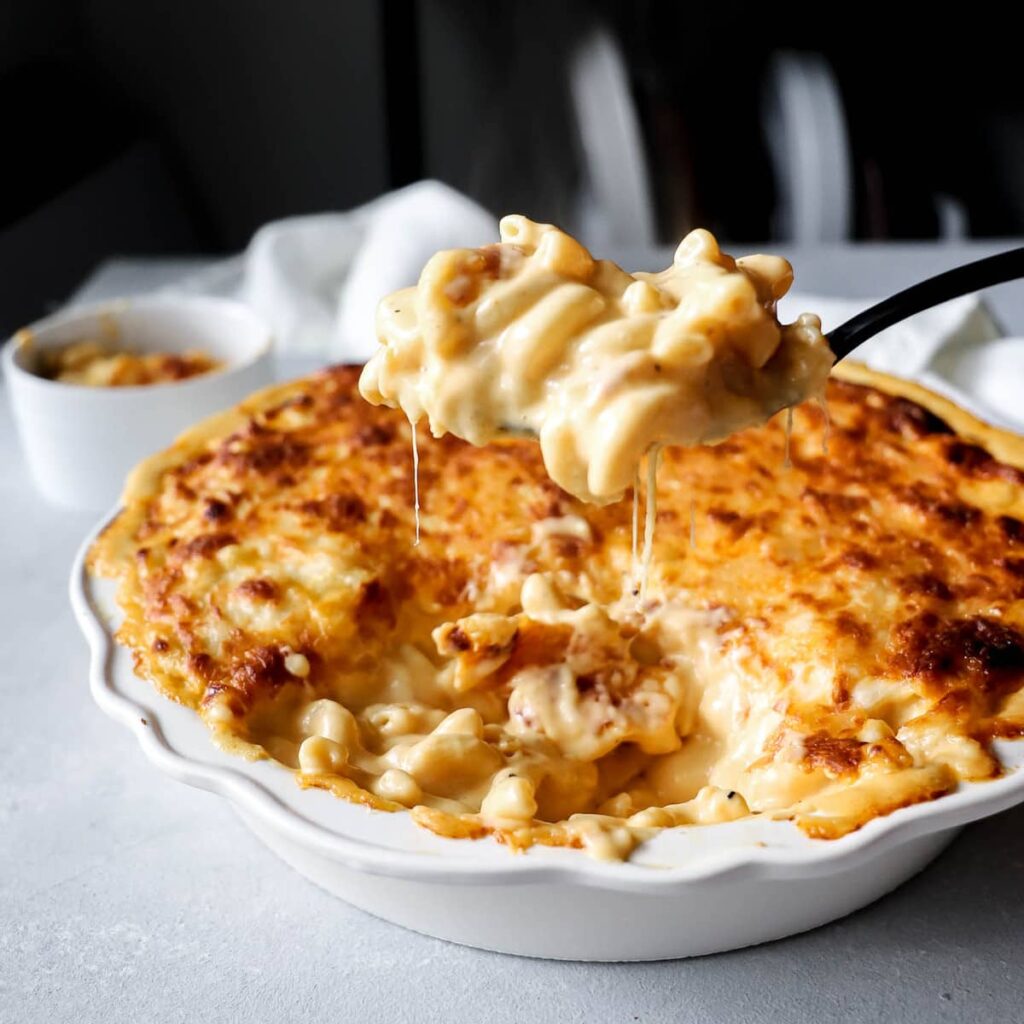
- Macaroni and Cheese: For a hearty side, creamy mac and cheese complements the tangy BBQ chicken with its rich, cheesy goodness.
These dishes beautifully complement the rich, smoky flavors of BBQ chicken, creating a balanced and satisfying meal.
Additional Meal Ideas
Here are some additional meal ideas that would pair well with your Baked BBQ Chicken Breast or enhance your meal planning:
- Shake and Bake BBQ Chicken: An easy and delightful twist on traditional BBQ chicken, involving a crispy coating and a sweet, tangy BBQ sauce finish. This dish is perfect for those who enjoy a crunchy texture alongside the classic BBQ flavor.
- Baked BBQ Pork Chops Thin: These pork chops are quick to prepare and delicious, especially with a homemade BBQ sauce that adds a personalized touch to the dish. They offer a succulent, tender alternative to chicken and are perfect for a quick weeknight dinner.
- Slow-Smoked Pulled Pork: For a more laid-back cooking day, slow-smoked pulled pork is a savory option that melts in your mouth, topped with tangy barbecue sauce for that classic BBQ taste.
Make Ahead, Storage, and Reheating Tips
Preparing your Baked BBQ Chicken Breast ahead of time, storing leftovers properly, and reheating them effectively can save time and preserve the deliciousness of your meal. Here’s how to manage each step:
Make Ahead Tips:
- Marinate Early: You can marinate the chicken breasts in BBQ sauce up to a day in advance. This not only saves time on the day of cooking but also enhances the flavor as the chicken soaks up the marinade.
- Partial Cook: If you’re pressed for time on serving day, you can partially cook the chicken in advance. Bake it for about half the usual time, cool, and refrigerate. On the day of serving, finish cooking it in the oven until it’s fully done.
Storage Tips:
- Cool Before Storing: Allow the cooked chicken to cool completely before storing to prevent bacterial growth. Never leave cooked chicken out at room temperature for more than two hours.
- Airtight Containers: Store leftovers in airtight containers to keep the chicken moist and prevent it from absorbing odors from other foods in the refrigerator.
- Refrigeration: Properly stored, cooked BBQ chicken can last in the refrigerator for up to 3-4 days.
Reheating Tips:
Find out how to reheat your BBQ without losing flavor using these methods:
- Oven Method: Reheat the chicken in an oven preheated to 350 degrees Fahrenheit. Place the chicken in a baking dish, add a few tablespoons of water or chicken broth to keep it moist, and cover it with foil. Heat until the internal temperature reaches 165 degrees Fahrenheit.
- Microwave Method: For a quicker option, you can use the microwave. Place the chicken in a microwave-safe dish, cover it with a damp paper towel to keep it moist, and heat on medium power in 30-second intervals until hot.
- Stovetop Method: Alternatively, you can reheat the chicken in a skillet over medium heat. Add a splash of BBQ sauce or a little water to keep the chicken moist while it heats through.
Using these methods will help ensure your Baked BBQ Chicken Breast remains juicy and flavorful, even after storage and reheating.
FAQs and Common Cooking Concerns
Recipe Science and Adjustments
Understanding the science behind cooking techniques can help you achieve better results with the Baked BBQ Chicken Breast recipe, and knowing how to adjust the recipe can cater to different tastes and dietary needs.
The Science of Baking Chicken
- Even Thickness: Pounding the chicken to even thickness promotes uniform cooking, preventing thinner parts from drying out before thicker sections are done.
- Marinating: Marinating chicken not only adds flavor but also tenderizes it. The acids in marinades help break down proteins, making the meat softer and more succulent.
- Cooking Temperature: Baking chicken at a moderate temperature (like 375°F) allows for gradual cooking that can preserve moisture better than high-heat methods, which can quickly dry out the meat.
Adjustments for Different Outcomes
- For More Tender Chicken: Brine your chicken before cooking. Dissolve salt in water (a good ratio is 1/4 cup of salt to 4 cups of water), submerge the chicken, and let it sit for a few hours before cooking. This helps increase the moisture content inside the chicken, resulting in a juicier dish.
- For Crispier Skin: If you’re using skin-on chicken breasts, consider broiling the chicken for a few minutes after it’s cooked through. This will crisp up the skin without overcooking the meat underneath.
- For a Smokier Flavor: Add smoked paprika or a touch of liquid smoke to your BBQ sauce to enhance the smokiness, mimicking a grilled flavor in the oven-baked recipe.
- For Lower Fat Content: Use skinless chicken breasts and reduce the amount of olive oil. You can substitute some of the oil in the marinade with yogurt or buttermilk, which will still help tenderize the chicken without adding extra fat.
For an even juicier option, you might want to check out our Moist BBQ chicken breast in oven- Easy & Delicious Recipe.
Baked BBQ Chicken Breast-30 min Oven Barbecue Chicken Recipe
Course: MainCuisine: AmericanDifficulty: Easy4
servings15
minutes30
minutes280
kcalThis 30 minutes Baked BBQ Chicken Breast recipe is a delicious and easy meal that the you and your family will enjoy.
Ingredients
Chicken Breasts: 4 large skinless, boneless chicken breasts (about 6-8 ounces each).
BBQ Sauce: 1 cup BBQ sauce
Olive Oil: 2 tablespoons
Garlic Powder: 1 teaspoon
Onion Powder: 1 teaspoon
Smoked Paprika: 1 teaspoon
Salt and Black Pepper: 1 teaspoon of each
Directions
- Preheat Oven: Start by heating your oven to 375 degrees Fahrenheit. This ensures your oven is hot enough to cook the chicken evenly and quickly.
- Prepare the Chicken: While the oven preheats, lay the chicken breasts on a cutting board and pat them dry with paper towels. This helps the seasoning stick better and promotes even cooking.
- Season the Chicken: In a small bowl, mix together the garlic powder, onion powder, smoked paprika, salt, and black pepper. Rub this seasoning mix all over the chicken breasts to coat them thoroughly.
- Oil and Sauce: Drizzle the olive oil over the seasoned chicken breasts, then brush them generously with BBQ sauce on all sides.
- Arrange for Baking: Place the chicken breasts in a baking dish or on a lined baking sheet. Make sure they are not touching to ensure they cook evenly.
- Bake the Chicken: Put the chicken in the preheated oven and bake for 25-30 minutes, or until the internal temperature of the chicken reaches 165 degrees Fahrenheit on a meat thermometer.
- Rest the Chicken: Once the chicken is cooked, remove it from the oven and let it rest for a few minutes. This helps the juices redistribute throughout the meat, making it moist and tender.
- Serve: Slice the chicken and serve it hot. You can add a final brush of BBQ sauce for a glossy, appetizing finish.
Recipe Video
Notes
- For extra juiciness and flavor, baste the chicken with additional BBQ sauce halfway through cooking.
Nutrition Information
Here’s a basic breakdown of the nutritional content for a typical serving of Baked BBQ Chicken Breast, assuming each serving is approximately 6 ounces of chicken and includes sauce:
- Calories: 280 kcal
- Protein: 35 g
- Total Fat: 9 g
- Saturated Fat: 2 g
- Unsaturated Fat: 7 g
- Carbohydrates: 14 g
- Dietary Fiber: 0 g
- Sugars: 10 g
- Cholesterol: 90 mg
- Sodium: 400 mg
- Micronutrients:
- Vitamin B6: Provides over 30% of the RDI, crucial for protein metabolism and immune function.
- Niacin (Vitamin B3): Important for energy production and skin health.
- Selenium: Offers antioxidant properties and helps protect cells from damage.
This nutritional profile can vary based on the specific ingredients and quantities used in your recipe, particularly the type of BBQ sauce and any additional seasonings. For those tracking dietary intake, it’s important to consider the sugar and sodium content, which can be higher depending on the sauce used. Opt for a homemade or low-sodium, low-sugar BBQ sauce to better control these aspects.
Cook’s Notes
Here are some personal tips and notes from the chef or recipe creator to enhance your cooking experience:
- Marinating Time: For the best flavor infusion, marinate the chicken overnight. If pressed for time, even 30 minutes of marinating can make a difference.
- Sauce Selection: Choosing the right BBQ sauce can transform the dish. Experiment with different types—sweet, tangy, spicy—to find what best suits your palate.
- Cooking Method Variations: While baking is the focus, don’t hesitate to finish the chicken on a grill for a few minutes for added smokiness and char.
- Serving Suggestions: Chicken breast prepared in the oven with BBQ sauce and spices for a flavorful and moist result, it can be serve with a light, refreshing salad or grilled vegetables to balance the richness of the BBQ sauce.
- Adjusting for Dietary Restrictions: For those on low-carb or ketogenic diets, consider using a sugar-free BBQ sauce. For gluten sensitivities, ensure the sauce and other ingredients are gluten-free.
We love hearing from you! If you’ve tried this Baked BBQ Chicken Breast recipe, please leave your comments and suggestions below. Sharing your experience not only helps us improve our recipes but also assists fellow cooks in making adjustments that might suit their tastes better. Whether it’s a tweak in seasoning, cooking time, or an entirely new serving suggestion, your feedback is invaluable.
- How did the recipe turn out for you?
- Did you make any modifications to the ingredients or cooking method?
- What sides did you pair with the BBQ chicken?
- Any tips for others who might try this recipe?
Feel free to share your thoughts and photos too! Let’s build a community around our love for delicious meals and collective cooking experiences.
Disclosure: Our blog contains affiliate links to products. We may receive a commission for purchases made through these links. However, this does not impact our reviews and comparisons. We try our best to keep things fair and balanced, in order to help you make the best choice for you.


One Comment